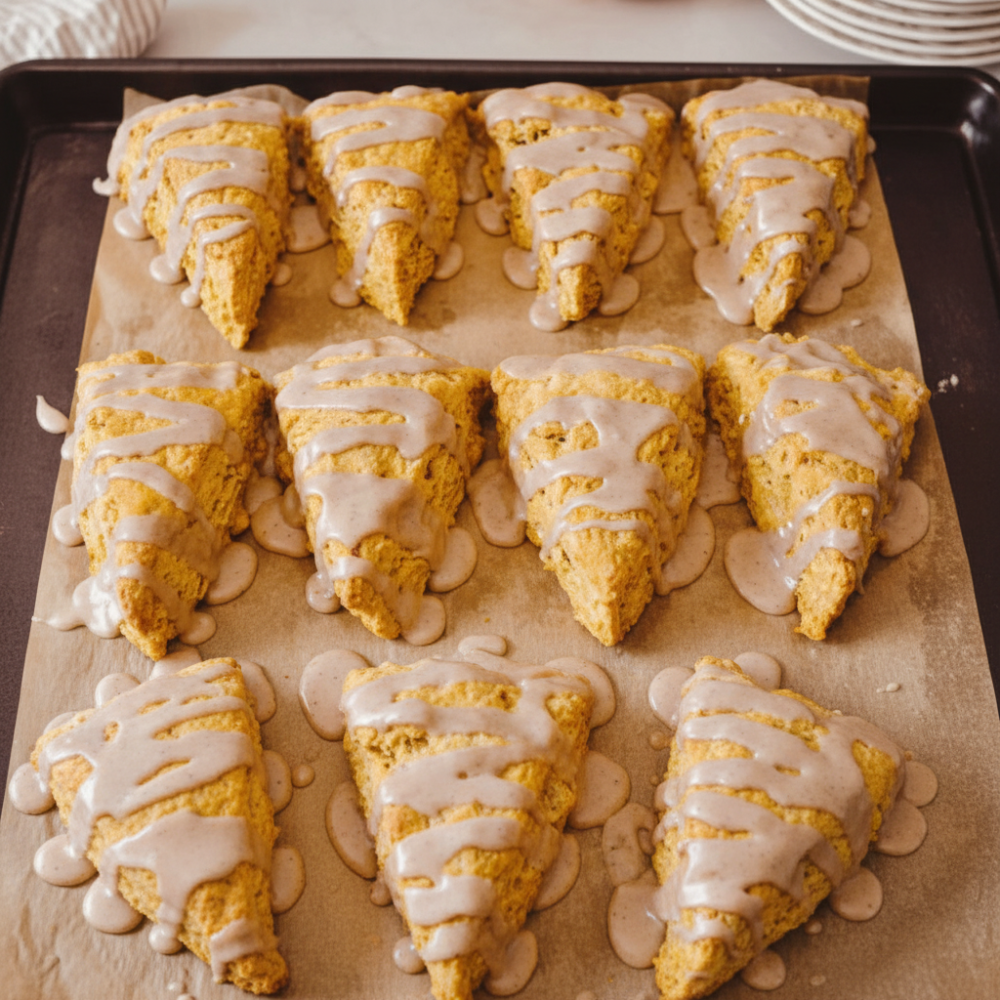
As autumn arrives, the kitchen fills with the scent of spices and the comforting warmth of fresh baking. Few things capture the essence of the season like a batch of homemade scones, especially when they combine the rich flavors of pumpkin with the unique tang of sourdough. These **Sourdough Pumpkin Scones** are a perfect example of fall baking at its best, offering a delightful twist on a classic **homemade baked breakfast treat**. They are simple to prepare, making them an **easy sourdough discard breakfast** option for busy mornings or leisurely weekends.
Introduction to Fall Baking
The season of crisp air and changing leaves naturally draws us to ingredients like pumpkin, cinnamon, nutmeg, and cloves. These flavors evoke a sense of coziness and tradition. While pumpkin pie often takes center stage, there are countless other ways to incorporate this versatile ingredient into your baking. Using **canned pumpkin baking recipes** allows for consistent results and convenience, bringing that earthy, sweet flavor to everything from breads to, in this case, incredibly tender scones. This recipe for **pumpkin spice discard scones** harnesses those quintessential fall flavors, delivering a satisfyingly spiced treat that pairs perfectly with a warm beverage. It is a simple yet sophisticated way to embrace the autumn season from your own kitchen.
Why Use Starter Discard for Scones?
Many sourdough bakers find themselves with a surplus of unfed starter, often referred to as discard. Rather than throwing it away, incorporating it into other recipes is a smart and sustainable practice. For scones, sourdough discard offers several benefits. Firstly, it adds a subtle tang that complements the sweetness of the pumpkin and the warmth of the spices, creating a more complex flavor profile. This tang is not overpowering; it simply adds depth. Secondly, the acidity in the sourdough helps to tenderize the dough, resulting in a scone with a wonderfully soft crumb and a delicate texture. Even though the discard is not active for leavening in this recipe, its enzymatic activity still contributes to the overall structure and taste. Using starter discard also means less waste and more delicious opportunities for **fall baking with starter discard**. It transforms what might be discarded into a valuable ingredient, enriching your baked goods without requiring active fermentation time. It is a win-win for flavor and practicality.
Essential Ingredients
Crafting these perfect **Sourdough Pumpkin Scones** begins with selecting the right ingredients. For the dry components, you will need **2 ½ cups (300g)** of all-purpose flour, which forms the structure of the scone. Granulated sugar, **½ cup (100g)**, provides sweetness and helps with browning. Leavening comes from **1 tablespoon** of baking powder and **½ teaspoon** of baking soda, ensuring a light and airy texture. For seasoning, **¾ teaspoon** of salt balances the flavors, and **2 teaspoons** of pumpkin pie spice infuse the scones with that unmistakable autumn aroma.
For the wet ingredients, **8 tablespoons (113g)** of cold unsalted butter, cut into small pieces, is crucial for creating flaky layers. Your unfed sourdough discard, **1 cup (240g)**, adds the signature tang and tenderness. **½ cup (120g)** of canned pumpkin puree provides moisture and rich pumpkin flavor. Be sure to use plain pumpkin puree, not pumpkin pie filling. **¼ cup (60ml)** of heavy cream contributes richness and helps bind the dough, with a little extra reserved for brushing the tops before baking. Finally, **1 teaspoon** of vanilla extract enhances the overall sweetness and spice profile. For the optional but highly recommended glaze, gather **1 cup (120g)** of powdered sugar, **2 tablespoons** of maple syrup, **2-3 tablespoons** of milk (as needed for consistency), and **¼ teaspoon** of vanilla extract.
Step-by-Step Instructions: Mixing and Shaping
Achieving perfect scones involves careful handling and precise steps. Begin by preheating your oven to **400°F (200°C)**. Line a baking sheet with parchment paper to prevent sticking and ensure even baking.
In a large bowl, whisk together the dry ingredients: **2 ½ cups (300g)** all-purpose flour, **½ cup (100g)** granulated sugar, **1 tablespoon** baking powder, **½ teaspoon** baking soda, **¾ teaspoon** salt, and **2 teaspoons** pumpkin pie spice. Ensure these are thoroughly combined.
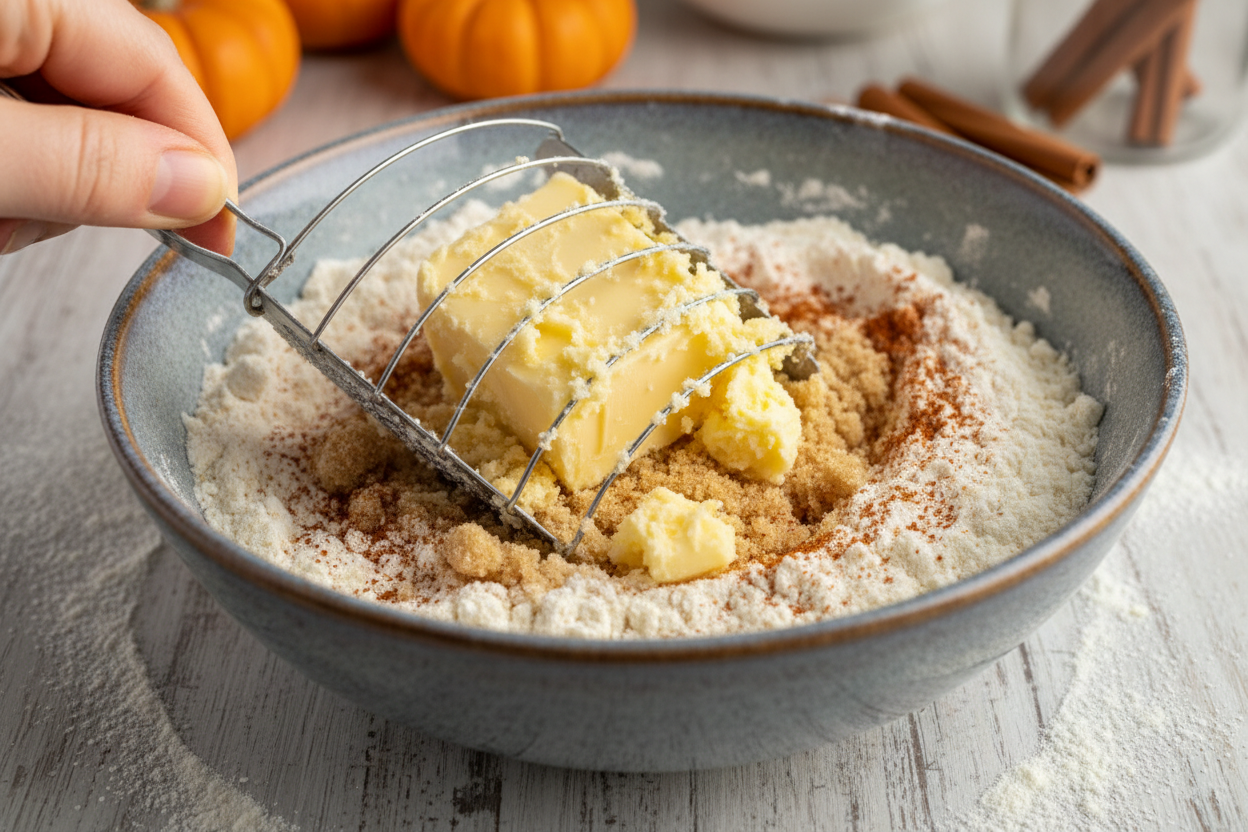
Next, add the **8 tablespoons (113g)** of cold, cubed unsalted butter to the dry mixture. Using a pastry blender, your fingertips, or a food processor, cut the butter into the flour until the mixture resembles coarse crumbs, with some pea-sized pieces of butter remaining. This step is critical for creating those desirable flaky layers. Do not overmix here; the goal is to keep the butter cold and distinct.
In a separate medium bowl, whisk together the wet ingredients: **1 cup (240g)** sourdough discard, **½ cup (120g)** canned pumpkin puree, **¼ cup (60ml)** heavy cream, and **1 teaspoon** vanilla extract until smooth.
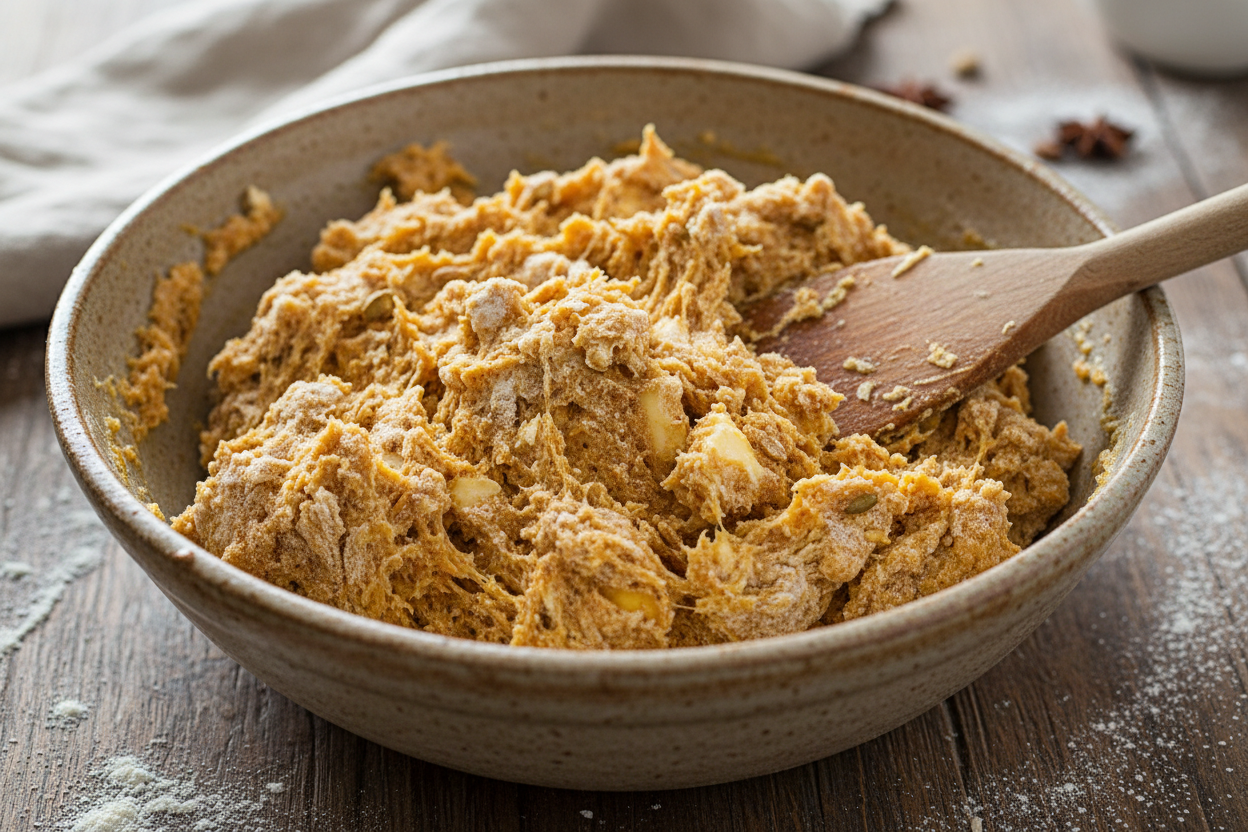
Pour the wet ingredient mixture into the dry ingredient mixture. With a spatula or wooden spoon, mix until just combined. The dough will be shaggy and sticky. Avoid overmixing, as this can develop the gluten too much, leading to tough scones.
Lightly flour a clean work surface. Turn the dough out onto the floured surface. Gently knead the dough only **2-3 times**, just enough to bring it together. Do not work the dough excessively.
Pat the dough into an **8-inch disc** that is approximately **1-inch thick**. Use a sharp knife or a bench scraper to cut the disc into **8 equal wedges**. These wedges are your individual scones.
Carefully transfer the cut scone wedges to the prepared baking sheet, leaving some space between each one. Brush the tops of the scones with a little extra heavy cream. This helps them achieve a beautiful golden-brown crust.
Baking Tips for Flaky Layers
Several factors contribute to truly flaky scones. First, ensure your butter is *very cold* when you incorporate it into the dry ingredients. The small pieces of cold butter will melt during baking, creating pockets of steam that push apart the layers of dough, resulting in a light and flaky texture. Second, handle the dough as little as possible. Overworking the dough develops gluten, which makes scones tough, not tender. Mix until just combined and knead only a few times to bring it together. Third, high heat is your friend. Baking at **400°F (200°C)** helps the scones rise quickly and encourages a crisp exterior while keeping the interior moist. Bake the scones for **18-22 minutes**, or until their tops are golden brown and a wooden skewer inserted into the center comes out clean. Do not underbake, as this can lead to a doughy interior.
Making the Perfect Maple Glaze
While these scones are delicious on their own, a simple **maple glazed scones** topping adds an extra layer of sweetness and seasonal flavor. To prepare the glaze, combine **1 cup (120g)** of powdered sugar, **2 tablespoons** of maple syrup, and **¼ teaspoon** of vanilla extract in a small bowl. Gradually whisk in **2-3 tablespoons** of milk, one tablespoon at a time, until you reach your desired drizzling consistency. The glaze should be smooth and thick enough to coat a spoon, but thin enough to drip down the sides of the scone. Once the scones have cooled slightly, drizzle the maple glaze generously over them. The warmth of the scones will help the glaze set just enough without fully melting.
Storage and Freezing Suggestions
Proper storage ensures your **Sourdough Pumpkin Scones** remain fresh and delicious. Once cooled, store leftover scones in an airtight container at room temperature for up to **3 days**. For longer storage, scones can be frozen. Wrap individual cooled scones tightly in plastic wrap, then place them in a freezer-safe bag or container. They will keep well in the freezer for up to **3 months**. To reheat, simply thaw frozen scones at room temperature, then warm them in a preheated oven at **300°F (150°C)** for about **10-15 minutes**, or until heated through. This method helps to restore some of their original texture.
Frequently Asked Questions
Q: Can I use active sourdough starter instead of discard?
A: While you can, discard is preferred for scones. Active starter might introduce too much leavening, altering the texture. The purpose of discard here is flavor and tenderness, not rise.
Q: What if I don’t have pumpkin pie spice?
A: You can create your own blend. For 2 teaspoons of pumpkin pie spice, combine 1 teaspoon cinnamon, ½ teaspoon ground ginger, ¼ teaspoon ground nutmeg, and ¼ teaspoon ground cloves.
Q: Can I make these ahead of time?
A: Yes, you can prepare the dough, cut the scones, and freeze them unbaked. Place the unbaked scones on a baking sheet and freeze until solid, then transfer to a freezer-safe bag. When ready to bake, place frozen scones on a prepared baking sheet, brush with cream, and bake at 400°F (200°C) for 20-25 minutes, adding a few extra minutes to the baking time.
Q: My scones turned out tough. What went wrong?
A: Tough scones are usually a result of overworking the dough. Too much kneading develops gluten, which makes the scones chewy rather than tender and flaky. Mix and handle the dough as little as possible.
These **Sourdough Pumpkin Scones** are a delightful way to celebrate the flavors of fall. With their tender crumb, subtle sourdough tang, and warm pumpkin spice, they are a perfect addition to any breakfast or brunch spread. Enjoy the simple pleasure of **homemade baked breakfast treats** that bring warmth and comfort to your home.
Follow our Facebook page for more delicious recipes and baking inspiration.
Sourdough Discard Pumpkin Scones with Maple Glaze
Ingredients
- 2 cup All-purpose flour Spoon and leveled
- 1/3 cup Brown sugar Packed
- 1 tbsp Baking powder Ensure it is fresh for a good rise
- 2 tsp Pumpkin pie spice Store-bought or homemade blend
- 1/2 tsp Salt Fine sea salt
- 1/2 cup Unsalted butter Cold and grated
- 1/2 cup Pumpkin puree Not pumpkin pie filling
- 1/2 cup Sourdough discard Unfed and chilled
- 2 tbsp Heavy cream For the dough
- 1 tsp Vanilla extract Pure extract
- 1 cup Powdered sugar Sifted
- 2 tbsp Maple syrup Pure maple syrup for the glaze
- 1 tbsp Milk For thinning the glaze
Instructions
- Preheat oven to 400F and line a large baking sheet with parchment paper.
- In a large bowl, whisk together the flour, brown sugar, baking powder, pumpkin pie spice, and salt.
- Cut the cold grated butter into the dry ingredients using a pastry blender or your fingers until the mixture resembles coarse crumbs.
- In a separate small bowl, whisk the pumpkin puree, sourdough discard, heavy cream, and vanilla extract until smooth.
- Pour the wet mixture into the dry ingredients, gently folding with a spatula until a shaggy dough forms. Be careful to avoid overmixing.
- Turn the dough out onto a lightly floured surface, gently knead 2 to 3 times to bring it together, and shape into an 8-inch disc.
- Use a sharp knife to cut the disc into 8 equal wedges, then transfer them to the prepared baking sheet.
- Bake for 15 to 18 minutes until lightly golden brown. Remove from oven and let cool completely on a wire rack.
- Whisk the powdered sugar, maple syrup, and milk in a small bowl to make the glaze. Drizzle over the cooled scones and allow it to set before serving.
For more daily recipes and tips, follow us on Facebook!
Click here to join our community!