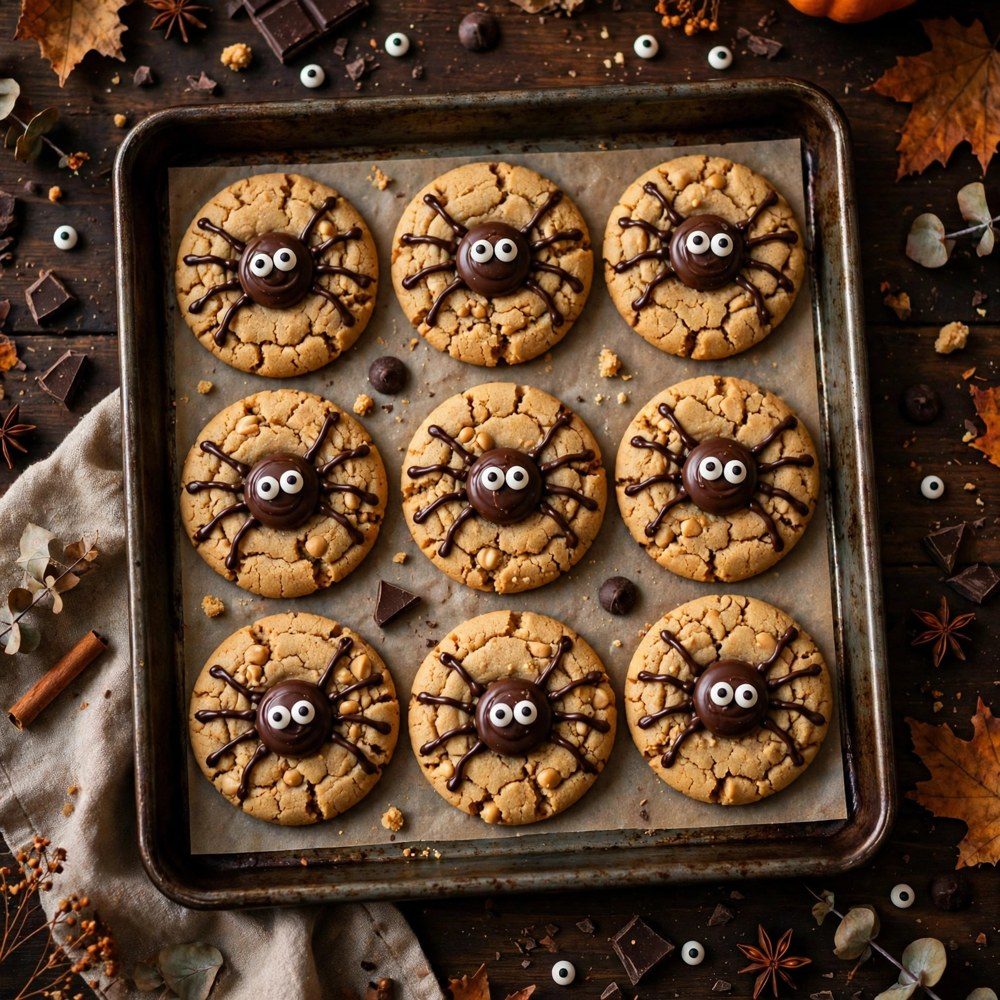
These Peanut Butter Spider Cookies are the Halloween treat that makes the whole table smile before anyone even takes a bite. You start with a soft, chewy peanut butter cookie, press a round chocolate candy into the warm center, then pipe on chocolate legs and pop on two candy eyes. They look like a project, but the dough comes together in one bowl and the decorating is simple enough for kids to run the show. Set them next to a bowl of Halloween buffalo chicken dip and a platter of spooky Halloween nachos, and your party spread is basically done.
What makes this recipe a keeper is the cookie itself. The mix of granulated and brown sugar keeps the centers soft for days, the tops crackle just enough in the oven, and that little well of warm cookie hugs the chocolate candy so it stays put without any frosting glue. Bake a batch for a classroom party, a trunk-or-treat, or a movie night at home, and watch the spiders disappear one leg at a time.
Ingredients Needed
Nothing fancy here: pantry staples for the cookies, plus three small items for the spiders. Have the candies unwrapped and the candy eyes out before baking, because the decorating window opens the moment the cookies leave the oven.
- 1/2 cup Unsalted Butter: Softened butter creams smoothly with the sugars and gives the cookies their tender, chewy bite.
- 3/4 cup Creamy Peanut Butter: Use a regular creamy peanut butter (not the natural, oil-separated kind) for dough that holds together and bakes evenly.
- 1/2 cup Granulated Sugar: Adds sweetness and helps the edges turn lightly crisp. Roll the dough balls in a little extra for a sparkly finish, if you like.
- 1/2 cup Light Brown Sugar: Packed. Brings moisture and a gentle caramel note that keeps the centers soft.
- 1 Large Egg: Room temperature, so it blends into the dough without curdling the butter.
- 1 tsp Vanilla Extract: Rounds out the peanut butter flavor.
- 1 1/4 cups All-Purpose Flour: Spooned and leveled, so the cookies stay soft instead of dense.
- 1/2 tsp Baking Soda: Gives the cookies their lift and signature crackled tops.
- 1/4 tsp Fine Sea Salt: Balances the sweetness and makes the peanut flavor pop.
- 18 Round Chocolate Peanut Butter Candies: One per cookie. Chocolate truffles or mini peanut butter cups turned upside down also work. Unwrap them before the cookies come out of the oven.
- 1/2 cup Semisweet Chocolate Chips: Melted and piped to draw the spider legs.
- 36 Candy Eyeballs: Two per spider. They are what turns a tasty cookie into the Halloween treat every kid reaches for first.
Step-by-Step Instructions
The dough needs no chilling and no mixer tricks. The only rule: work while the cookies are warm when you add the candy bodies, then let everything set before stacking.
- Heat the oven to 350°F (175°C). Line two large baking sheets with parchment paper. Unwrap the chocolate candies and set them in a bowl with the candy eyeballs so decorating is grab-and-go later.
- In a large bowl, beat the softened butter, peanut butter, granulated sugar, and brown sugar together until light and fluffy, about 1 to 2 minutes. Beat in the egg and vanilla extract until smooth.
- In a second bowl, whisk the flour, baking soda, and salt. Add the dry ingredients to the peanut butter mixture and stir just until a soft dough forms and no flour streaks remain. Do not overmix, or the cookies will bake up dense.
- Scoop the dough into 1 1/2-tablespoon balls, roll them smooth between your palms, and place them 2 inches apart on the prepared sheets. For a sparkly bakery finish, roll the balls lightly in extra granulated sugar first.
- Bake for 10 to 12 minutes, until the edges look set and the tops are puffed with fine cracks. The centers will still look slightly soft, and that is exactly right. Immediately press one chocolate candy gently into the center of each warm cookie, just deep enough to anchor it. Let the cookies cool on the pan for 5 minutes, then move them to a rack.
- Melt the chocolate chips in a microwave-safe bowl in 20-second bursts, stirring between each, until smooth. Spoon the melted chocolate into a small zip-top bag, snip off a tiny corner, and pipe 4 short legs down each side of every candy body. Dab a dot of chocolate on the front of each candy and press on two candy eyeballs. Let the spiders set for about 15 minutes before serving or stacking.


Cooking Tips and Variations
Small details make these cookies foolproof, and the decorating step is forgiving by design: wobbly legs just give each spider more personality.
Keep the Cookies Soft
Pull the trays when the edges are set but the centers still look a touch underdone. The cookies finish setting on the hot pan, and that is how you keep the chewy middle for up to 4 days in an airtight container.
Make Them Ahead
The dough balls freeze beautifully. Freeze them on a tray until firm, store in a bag for up to 2 months, and bake straight from frozen with 1 to 2 extra minutes. Decorate after baking, as usual.
Easy Swaps
No peanut butter candies on hand? Use chocolate truffles, malted milk balls, or a thick chocolate kiss pressed in point-side down. For a nut-free classroom batch, swap in sunflower seed butter and use plain chocolate truffles; the spiders look exactly the same.
Frequently Asked Questions
Everything readers usually ask before the first tray goes into the oven.
Why did my cookies crack so much?
Those fine cracks are normal for peanut butter cookies and they are a good sign: they mean the tops set while the centers stayed soft. If the cookies spread flat instead, the butter was probably melted rather than softened. Start with butter that gives slightly when pressed, never liquid.
Can I freeze the finished spider cookies?
Yes, but freeze them in a single layer first so the legs and eyes do not snap off, then stack between sheets of parchment in a freezer container for up to 2 months. Thaw at room temperature for about 30 minutes. The candy eyes may sweat a little; they still taste fine.
What is the easiest way to pipe the legs?
A zip-top bag with the tiniest corner snipped off gives you the most control. Pipe slowly, 4 legs per side, pulling away from the candy body. If the chocolate starts to firm up, warm the bag between your hands for a few seconds and keep going.
Bake these Peanut Butter Spider Cookies once and they will join your yearly Halloween rotation: one bowl of dough, a bag of chocolate candies, and a tray full of spiders that are more cute than creepy. For the rest of your fall dessert table, these sourdough pumpkin bars with cream cheese frosting are the perfect make-ahead partner.
For more easy Halloween treats and fall baking ideas, follow our Facebook page.

Peanut Butter Spider Cookies
Ingredients
- 1/2 cup Unsalted butter softened
- 3/4 cup Creamy peanut butter room temperature
- 1/2 cup Granulated sugar plus extra for rolling, optional
- 1/2 cup Light brown sugar packed
- 1 Large egg room temperature
- 1 tsp Vanilla extract
- 1 1/4 cups All-purpose flour spooned and leveled
- 1/2 tsp Baking soda
- 1/4 tsp Fine sea salt
- 18 Round chocolate peanut butter candies or chocolate truffles, unwrapped
- 1/2 cup Semisweet chocolate chips melted, for the legs
- 36 Candy eyeballs
Instructions
- Heat the oven to 350°F (175°C). Line two baking sheets with parchment paper.
- Beat the butter, peanut butter, granulated sugar, and brown sugar until light and fluffy, 1 to 2 minutes. Beat in the egg and vanilla.
- Whisk the flour, baking soda, and salt. Mix into the wet ingredients just until a soft dough forms.
- Scoop 1 1/2-tablespoon balls of dough, roll smooth, and place 2 inches apart on the sheets.
- Bake 10 to 12 minutes, until the edges are set and the tops crack slightly. While warm, press one chocolate candy gently into the center of each cookie. Cool 5 minutes.
- Pipe 8 chocolate legs around each candy with the melted chocolate. Attach two candy eyes to each candy with a dot of chocolate. Let set 15 minutes before serving.
For more daily recipes and tips, follow us on Facebook!
Click here to join our community!